


Introduction
Greenbone Vulnerability Manager (GVM) is a powerful tools but — IMHO, less popular compare to the others. People knows about OpenVAS as vulnerability scanner, however, in the era where IT assets increase every single day, the role of good vulnerability management will be highly required by organisations in order to manage assets and their vulnerabilities automatically. Having good understanding of GVM will increase organisations efficiency on managing asset vulnerabilities because GVM can integrated with various tools and also various in-house scripting.
In this article, I am going to show some basic foundation of GVM architectures, what’s the role of each components, setting up and installation of each component.
The Architecture
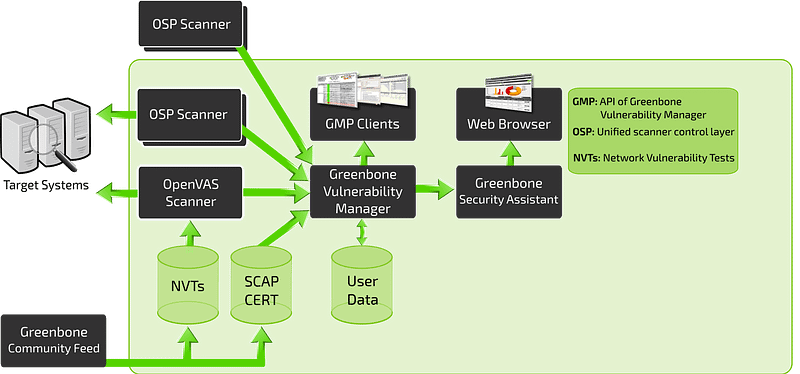
The Greenbone Vulnerability Management (GVM) is a framework of several services. The Greenbone Vulnerability Manager is the central service that consolidates plain vulnerability scanning into a full vulnerability management solution. GVMd controls the OpenVAS Scanner via an internal protocol and supports the generic Open Scanner Protocol (OSP) for other scanner integrations.
As mentioned earlier, GVM performed vulnerability management and act as central role that integrate various components that contribute to manage asset vulnerabilities. Some component has been explained by Jan on this link,

Installation, Setup, and Configuration
The architecture above realised into several software components:
- gvm-libs
- gvmd
- openvas
- gsa
- ospd
- ospd-openvas
All of them available at Greenbone Networks GmbH Github repository.
As officially stated by Greenbone, the supported OS for GVM project is Debian 10.2, however, on this article I will use Kali linux 2020.2. The reason is simple, Kali linux used by many people in IT security community. Although OpenVAS is installed, many people expects to have scripting capabilities available to control the OpenVAS (or any other scanner) through GVM.
The installation explained here will be installing OpenVAS from scratch. If your system already install OpenVAS before, it is better to remove them first in order to clean-up the system configuration, path binaries, etc.
root@kali$ apt --purge autoremove openvasOS Requirements
Before starting installation of each components, we must ensure all pre-requisites are available in the operation systems. These pre-requisites will be required to perform task such as source code compilations, configuration, and installations of each GVM components.
### update repository
cyberheb@kali$ sudo apt-get update

cyberheb@kali$ sudo apt-get install apt-utils software-properties-common --no-install-recommends -yq

cyberheb@kali$ apt-get dist-upgrade -yq

cyberheb@kali$ sudo apt-get install cmake gcc g++ pkg-config make bison flex libglib2.0-dev libgpgme-dev libgnutls28-dev uuid-dev libssh-gcrypt-dev libldap2-dev doxygen graphviz libradcli-dev libhiredis-dev libpcap-dev libksba-dev libsnmp-dev gcc-mingw-w64 heimdal-dev libpopt-dev xmltoman redis-server xsltproc libical-dev postgresql postgresql-contrib postgresql-server-dev-all gnutls-bin nmap rpm nsis curl wget fakeroot gnupg sshpass socat snmp smbclient libmicrohttpd-dev libxml2-dev gettext rsync xml-twig-tools python3-paramiko python3-lxml python3-defusedxml python3-pip python3-psutil virtualenv git gosu redis zlib1g-dev clang-format libldap2-dev perl-base libunistring-dev python3-setuptools python3-dev python3-polib texlive-fonts-recommended texlive-latex-extra sudo vim -yq
Installing YARN package manager. YARN will be required later to install various software to build GSA (Greenbone Security Assistant) — The web application interface that connects to the GVM to provide a full-featured user interface for vulnerability management.
cyberheb@kali$ curl -sS https://dl.yarnpkg.com/debian/pubkey.gpg |  sudo apt-key add -

cyberheb@kali$ echo "deb https://dl.yarnpkg.com/debian/ stable main" | sudo tee /etc/apt/sources.list.d/yarn.list

cyberheb@kali$ sudo apt-get update

cyberheb@kali$ sudo apt-get install yarn -yq
PostgreSQL
root@kali# apt install postgresql postgresql-contrib postgresql-server-dev-allOnce the installation is done, create the PostgreSQL user and database for Greenbone Vulnerability Management Daemon (gvmd). Note that the database and user should be created as PostgreSQL user, postgres.
root@kali# sudo -Hiu postgres
postgres@kali$ createuser gvm
postgres@kali$ createdb -O gvm gvmd
Grant PostgreSQL User DBA Roles
postgres@kali$ psql gvmd
gvmd=# create role dba with superuser noinherit;
gvmd=# grant dba to gvm;
gvmd=# create extension "uuid-ossp";
gvmd=# \q

postgres@kali$ exit
Once that is done, restart PostgreSQL.
root@kali# systemctl restart postgresql
root@kali# systemctl enable postgresql
Building GVM 11 from Source Code
GVM will be run using special user intended only to run GVM. So we need to add user ‘gvm’ to the operating system.
cyberheb@kali$ sudo mkdir -p /opt/gvm

cyberheb@kali$ sudo adduser gvm --disabled-password --home /opt/gvm/ --no-create-home --gecos ''

cyberheb@kali$ sudo usermod -aG redis gvm

cyberheb@kali$ sudo chown gvm:gvm /opt/gvm/ -R
Switch to user gvm, and prepare some environment variable.
cyberheb@kali$$ sudo su - gvm

gvm@kali$ echo "export SRC_PATH=/opt/gvm/src/" >> ~/.bashrc

gvm@kali$ echo "export PATH=$PATH:/opt/gvm/bin:/opt/gvm/sbin:/opt/gvm/.local/bin" >> ~/.bashrc

gvm@kali$ export PKG_CONFIG_PATH=/opt/gvm/lib/pkgconfig:$PKG_CONFIG_PATH
Clone all the GVM software from its repositories.
gvm@kali$ bash

gvm@kali$ mkdir ${SRC_PATH} -p && cd ${SRC_PATH}

### gvm-libs
gvm@kali$ git clone -b gvm-libs-11.0 --single-branch  https://github.com/greenbone/gvm-libs.git

### openvas
gvm@kali$ git clone -b openvas-7.0 --single-branch https://github.com/greenbone/openvas.git

### gvmd
gvm@kali$ git clone -b gvmd-9.0 --single-branch https://github.com/greenbone/gvmd.git

### openvas-smb
gvm@kali$ git clone -b master --single-branch https://github.com/greenbone/openvas-smb.git

### gsa
gvm@kali$ git clone -b gsa-9.0 --single-branch https://github.com/greenbone/gsa.git

### ospd-openvas
gvm@kali$ git clone -b ospd-openvas-1.0 --single-branch  https://github.com/greenbone/ospd-openvas.git

### ospd
gvm@kali$ git clone -b ospd-2.0 --single-branch https://github.com/greenbone/ospd.git
GVM-LIBS
GVM-LIBS is the libraries module for the Greenbone Vulnerability Management Solution. It is used for the Greenbone Security Manager appliances and provides various functionalities to support the integrated service daemons.
These libraries need to be compiled and installed first before compiling and installing GVMD.
gvm@kali$ cd ${SRC_PATH}/gvm-libs
gvm@kali$ mkdir build
gvm@kali$ cd build
gvm@kali$ cmake -DCMAKE_INSTALL_PREFIX=/opt/gvm ..
gvm@kali$ make && make doc && make install
gvm@kali$ cd ${SRC_PATH}
Update the PATH environment variable on /etc/environment to include the GVM binary path.
root@kali$ echo "PATH=\$PATH:/opt/gvm/bin:/opt/gvm/sbin:/opt/gvm/.local/bin" > /etc/profile.d/gvm.shAdd GVM library path to /etc/ld.so.conf.d.
root@kali$ echo "/opt/gvm/lib" > /etc/ld.so.conf.d/gvm.confOPENVAS-SMB
Open Vulnerability Assessment Scanner (OpenVAS) is a full-featured scan engine that executes a continuously updated and extended feed of Network Vulnerability Tests (NVTs).
OpenVAS SMB provides modules for the OpenVAS Scanner to interface with Microsoft Windows Systems through the Windows Management Instrumentation API and a winexe binary to execute processes remotely on that system.
Build and install openvas-smb.
gvm@kali$ cd ${SRC_PATH}/openvas-smb
gvm@kali$ mkdir build && cd build
gvm@kali$ cmake -DCMAKE_INSTALL_PREFIX=/opt/gvm ..
gvm@kali$ make && make install
gvm@kali$ cd ${SRC_PATH}
OPENVAS
Build and install OpenVAS scanner.
gvm@kali$ cd ${SRC_PATH}/openvas
gvm@kali$ mkdir build && cd build
gvm@kali$ cmake -DCMAKE_INSTALL_PREFIX=/opt/gvm ..
gvm@kali$ make && make doc && make install
gvm@kali$ exit
If you encounter the following error, ...error: ‘pcap_lookupdev’ is deprecated: use 'pcap_findalldevs'... while compiling openvas, the solution is to edit file CMakeLists.txt and replace the following line.
vim ../../openvas/CMakeLists.txt
...
#set (CMAKE_C_FLAGS_DEBUG "${CMAKE_C_FLAGS_DEBUG} ${COVERAGE_FLAGS}")
set (CMAKE_C_FLAGS_DEBUG "${CMAKE_C_FLAGS_DEBUG} -Werror -Wno-error=deprecated-declarations")
...
Once done, save and exit the file and rerun the installation.
Alternatively, if you couldn’t find file CMakeLists.txt, run the following cmake first, and then run the rest of command above (make && make install).
gvm@kali$ cmake .. -DCMAKE_INSTALL_PREFIX=/opt/gvm -DCMAKE_BUILD_TYPE=RELEASEConfigure OpenVAS-REDIS
The host scan information is stored temporarily on Redis server. The default configuration of Redis server is /etc/redis/redis.conf. We need to add configuration for OpenVAS using root user.
root@kali$ ldconfig

root@kali$ mkdir /var/run/redis-openvas

root@kali$ chown redis.redis /var/run/redis-openvas -R

root@kali$ cp /opt/gvm/src/openvas/config/redis-openvas.conf /etc/redis/

root@kali$ chown redis:redis /etc/redis/redis-openvas.conf

root@kali$ echo "db_address = /run/redis-openvas/redis-server.sock" > /opt/gvm/etc/openvas/openvas.conf

root@kali$ chown gvm:gvm /opt/gvm/etc/openvas/openvas.conf

root@kali$ usermod -aG redis gvm
SUDOER
A number of Network Vulnerability Tests (NVTs) require root privileges to perform certain operations. Since openvas is launched from an ospd-openvas process, via sudo, add the line below to sudoers file to ensure that the gvm user used in this demo can run the openvas with elevated rights using passwordless sudo.
Also, update the secure_path to include the GVM /sbin paths, /opt/gvm/sbin.
root@kali# sed -i 's/secure_path.*/secure_path=\"\/usr\/local\/sbin\:\/usr\/local\/bin\:\/usr\/sbin\:\/usr\/bin\:\/sbin\:\/bin\:\/snap\/bin\:\/opt\/gvm\/sbin\"/g' /etc/sudoers

root@kali# echo 'gvm ALL = NOPASSWD: /opt/gvm/sbin/openvas' >> /etc/sudoers

root@kali# echo 'gvm ALL = NOPASSWD: /opt/gvm/sbin/gsad' >> /etc/sudoers
Update NVTs
root@kali# su - gvm
gvm@kali$ which greenbone-nvt-sync
/opt/gvm/bin/greenbone-nvt-sync
gvm@kali$ which greenbone-nvt-sync
Build and Install Greenbone Vulnerability Manager
gvm@kali$ export PKG_CONFIG_PATH=/opt/gvm/lib/pkgconfig:$PKG_CONFIG_PATH
gvm@kali$ cd ${SRC_PATH}/gvmd
gvm@kali$ mkdir build
gvm@kali$ cd build
gvm@kali$ cmake .. -DCMAKE_INSTALL_PREFIX=/opt/gvm
gvm@kali$ make
gvm@kali$ make install
If you’re getting the following message while building gvmd on a distro shipping a recent PostgreSQL version 13:
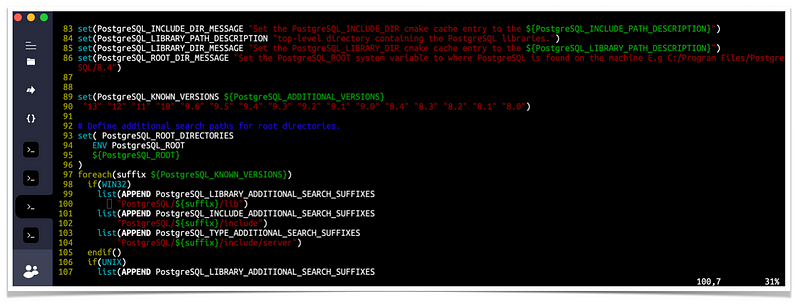
-- Looking for PostgreSQL...CMake Error at /usr/share/cmake-3.18/Modules/FindPackageHandleStandardArgs.cmake:165 (message): Could NOT find PostgreSQL (missing: PostgreSQL_TYPE_INCLUDE_DIR) (found version "13.0")then it means the cmake version doesn’t support PostgreSQL 13 yet. Basically you need to manually update the following file (example from Debian testing and the path depends on your distro) so that PostgreSQL 13 is getting recognized:
/usr/share/cmake-3.18/Modules/FindPostgreSQL.cmakeJust replace:
set(PostgreSQL_KNOWN_VERSIONS ${PostgreSQL_ADDITIONAL_VERSIONS} "12" "11" "10" "9.6" "9.5" "9.4" "9.3" "9.2" "9.1" "9.0" "8.4" "8.3" "8.2" "8.1" "8.0")to:
set(PostgreSQL_KNOWN_VERSIONS ${PostgreSQL_ADDITIONAL_VERSIONS} "13" "12" "11" "10" "9.6" "9.5" "9.4" "9.3" "9.2" "9.1" "9.0" "8.4" "8.3" "8.2" "8.1" "8.0")and try to build gvmd again.
Build and Install Greenbone Security Assistant
gvm@kali$ cd ${SRC_PATH}/gsa

gvm@kali$ mkdir build

gvm@kali$ cd build

gvm@kali$ cmake .. -DCMAKE_INSTALL_PREFIX=/opt/gvm -DCMAKE_BUILD_TYPE=RELEASE

gvm@kali$ make && make install
Update GVM CERT and SCAP data from the feed servers
root@kali# greenbone-scapdata-sync
root@kali# greenbone-certdata-sync
Consider setting cron jobs to run the nvts, cert and scap data update scripts at your preferred frequency to pull updates from the feed servers.
Next, run the command below to generate certificates gvmd. Server certificates are used for authentication while client certificates are primarily used for authorization. More on man gvm-manage-certs.
root@kali# gvm-manage-certs -aHere’s the sample of output showing the scripts creating certificates and private key for 3 components: CA, server, and client.
Generated private key in /tmp/tmp.P21HNTDEuD/cakey.pem.
Generated self signed certificate in /tmp/tmp.P21HNTDEuD/cacert.pem.
Installed private key to /opt/gvm/var/lib/gvm/private/CA/cakey.pem.
Installed certificate to /opt/gvm/var/lib/gvm/CA/cacert.pem.
Generated private key in /tmp/tmp.P21HNTDEuD/serverkey.pem.
Generated certificate request in /tmp/tmp.P21HNTDEuD/serverrequest.pem.
Signed certificate request in /tmp/tmp.P21HNTDEuD/serverrequest.pem with CA certificate in /opt/gvm/var/lib/gvm/CA/cacert.pem to generate certificate in /tmp/tmp.P21HNTDEuD/servercert.pem
Installed private key to /opt/gvm/var/lib/gvm/private/CA/serverkey.pem.
Installed certificate to /opt/gvm/var/lib/gvm/CA/servercert.pem.
Generated private key in /tmp/tmp.P21HNTDEuD/clientkey.pem.
Generated certificate request in /tmp/tmp.P21HNTDEuD/clientrequest.pem.
Signed certificate request in /tmp/tmp.P21HNTDEuD/clientrequest.pem with CA certificate in /opt/gvm/var/lib/gvm/CA/cacert.pem to generate certificate in /tmp/tmp.P21HNTDEuD/clientcert.pem
Installed private key to /opt/gvm/var/lib/gvm/private/CA/clientkey.pem.
Installed certificate to /opt/gvm/var/lib/gvm/CA/clientcert.pem.
Removing temporary directory /tmp/tmp.P21HNTDEuD.
Build and Install OSPd and OSPd-OpenVAS
Open Scanner Protocol (OSP) creates a unified interface for different security scanners and makes their control flow and scan results consistently available under the central Greenbone Vulnerability Manager service.
$ python3 -V
Python 3.9.2

$ virtualenv --python python3.9 /opt/gvm/bin/ospd-scanner/

$ source /opt/gvm/bin/ospd-scanner/bin/activate

(ospd-scanner) gvm@kali:/opt/gvm$ cd /opt/gvm/src/ospd

(ospd-scanner) gvm@kali:/opt/gvm/src/ospd$ pip3 install .

(ospd-scanner) gvm@kali:/opt/gvm$ cd /opt/gvm/src/ospd-openvas

(ospd-scanner) gvm@kali:/opt/gvm/src/ospd-openvas$ pip3 install .

(ospd-scanner) gvm@kali:/opt/gvm/src/ospd-openvas$ export PKG_CONFIG_PATH=/opt/gvm/lib/pkgconfig:$PKG_CONFIG_PATH

(ospd-scanner) gvm@kali:/opt/gvm/src/ospd-openvas$ mkdir -p /opt/gvm/lib/python3.8/site-packages/

(ospd-scanner) gvm@kali:/opt/gvm/src/ospd-openvas$ export PYTHONPATH=/opt/gvm/lib/python3.8/site-packages

(ospd-scanner) gvm@kali:/opt/gvm/src/ospd-openvas$ cd /opt/gvm/src/ospd

(ospd-scanner) gvm@kali:/opt/gvm/src/ospd-openvas$ python3 setup.py install --prefix=/opt/gvm

(ospd-scanner) gvm@kali:/opt/gvm/src/ospd-openvas$ cd /opt/gvm/src/ospd-openvas

(ospd-scanner) gvm@kali:/opt/gvm/src/ospd-openvas$ python3 setup.py install --prefix=/opt/gvm
Start OpenVAS Scanner, GSA and GVM services
Run the commands below as gvm user to start OpenVAS scanner, GSA (WebUI service), and GVM daemon. Execute the commands in the presented order.
Start OpenVAS
$ /usr/bin/python3 /opt/gvm/bin/ospd-openvas \
--pid-file /opt/gvm/var/run/ospd-openvas.pid \
--log-file /opt/gvm/var/log/gvm/ospd-openvas.log \
--lock-file-dir /opt/gvm/var/run -u /opt/gvm/var/run/ospd.sock
Start GVM
$ gvmd --osp-vt-update=/opt/gvm/var/run/ospd.sockStart GSA
$ sudo gsadConsider creating systemd service unit files for these services to enable you manage them easily.
Check the status:
$ ps aux | grep -E "ospd-openvas|gsad|gvmd" | grep -v grepSample output:
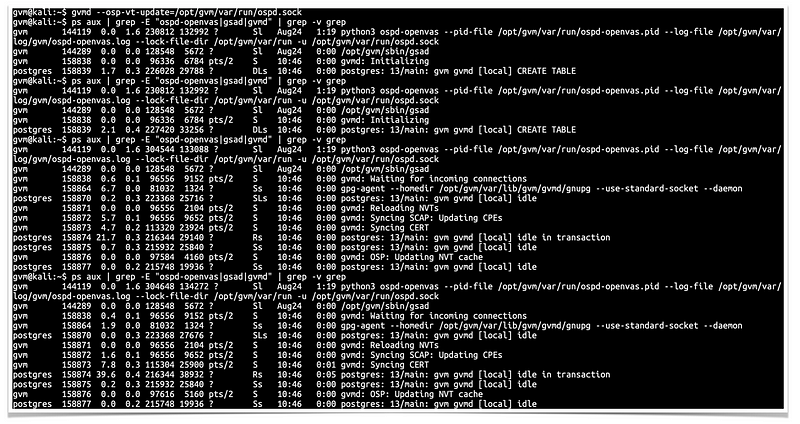
You can also find the logs at, <install-prefix>/var/log/gvm/, which in this case is /opt/gvm/var/log/gvm.
Creating Systemd Service units for GVM services
If you had run the services commands above, be sure to stop them before you can rerun using systemd.
Create OpenVAS service
# vim /etc/systemd/system/openvas.service
[Unit]
Description=Control the OpenVAS service
After=redis.service
After=postgresql.service
[Service]
ExecStartPre=-rm -rf /opt/gvm/var/run/ospd-openvas.pid /opt/gvm/var/run/ospd.sock /opt/gvm/var/run/gvmd.sock
Type=simple
User=gvm
Group=gvm
Environment=PATH=/usr/local/sbin:/usr/local/bin:/usr/sbin:/usr/bin:/sbin:/bin:/usr/games:/usr/local/games:/opt/gvm/bin:/opt/gvm/sbin:/opt/gvm/.local/bin
Environment=PYTHONPATH=/opt/gvm/lib/python3.8/site-packages
ExecStart=/usr/bin/python3 /opt/gvm/bin/ospd-openvas \
--pid-file /opt/gvm/var/run/ospd-openvas.pid \
--log-file /opt/gvm/var/log/gvm/ospd-openvas.log \
--lock-file-dir /opt/gvm/var/run -u /opt/gvm/var/run/ospd.sock
RemainAfterExit=yes
[Install]
WantedBy=multi-user.target
Save and exit the file and start OpenVas.
# systemctl daemon-reload
# systemctl start openvas
Check the status of the service
# systemctl status openvas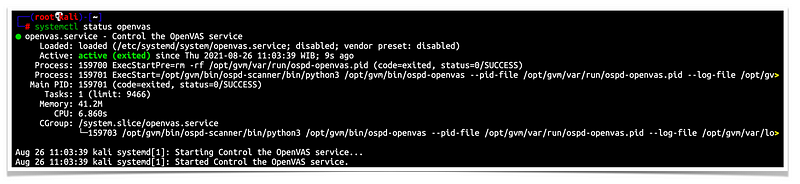
Enable OpenVAS scanner to run on system boot.
# systemctl enable openvasCreate GSA Service Unit file
# vim /etc/systemd/system/gsa.service
[Unit]
Description=Control the OpenVAS GSA service
After=openvas.service
[Service]
Type=simple
User=gvm
Group=gvm
Environment=PATH=/usr/local/sbin:/usr/local/bin:/usr/sbin:/usr/bin:/sbin:/bin:/usr/games:/usr/local/games:/opt/gvm/bin:/opt/gvm/sbin:/opt/gvm/.local/bin
Environment=PYTHONPATH=/opt/gvm/lib/python3.8/site-packages
ExecStart=/usr/bin/sudo /opt/gvm/sbin/gsad
RemainAfterExit=yes
[Install]
WantedBy=multi-user.target
# vim /etc/systemd/system/gsa.path
[Unit]
Description=Start the OpenVAS GSA service when gvmd.sock is available
[Path]
PathChanged=/opt/gvm/var/run/gvmd.sock
Unit=gsa.service
[Install]
WantedBy=multi-user.target
Create GVM Service unit file
# vim /etc/systemd/system/gvm.service
[Unit]
Description=Control the OpenVAS GVM service
After=openvas.service
[Service]
Type=simple
User=gvm
Group=gvm
Environment=PATH=/usr/local/sbin:/usr/local/bin:/usr/sbin:/usr/bin:/sbin:/bin:/usr/games:/usr/local/games:/opt/gvm/bin:/opt/gvm/sbin:/opt/gvm/.local/bin
Environment=PYTHONPATH=/opt/gvm/lib/python3.8/site-packages
ExecStart=/opt/gvm/sbin/gvmd --osp-vt-update=/opt/gvm/var/run/ospd.sock
RemainAfterExit=yes
[Install]
WantedBy=multi-user.target
# vim /etc/systemd/system/gvm.path
[Unit]
Description=Start the OpenVAS GVM service when opsd.sock is available
[Path]
PathChanged=/opt/gvm/var/run/ospd.sock
Unit=gvm.service
[Install]
WantedBy=multi-user.target
Reload system unit configs and start the services.
# systemctl daemon-reload
# systemctl enable --now gvm.{path,service}
# systemctl enable --now gsa.{path,service}
Create GVM Scanner
Since we launched the scanner and set it to use our non-standard scanner host path (/opt/gvm/var/run/ospd.sock), we need to create and register our scanner.
gvm@kali$ gvmd --create-scanner="OpenVAS Scanner 01 - Staging Env" --scanner-type="OpenVAS" --scanner-host=/opt/gvm/var/run/ospd.sockNext, you need to verify your scanner. For this, you first need to get the scanner identifier.
gvm@kali$ sudo -Hiu gvm gvmd --get-scanners
08b69003-5fc2-4037-a479-93b440211c73  OpenVAS  /tmp/ospd.sock  0  OpenVAS Default
6acd0832-df90-11e4-b9d5-28d24461215b  CVE    0  CVE
05994048-f7f5-4469-a8f1-9e4d54cea606  OpenVAS  /opt/gvm/var/run/ospd.sock  9390  OpenVAS Scanner 01 - Staging Env
Based on the output above, our scanner UUID is, 05994048-f7f5–4469-a8f1–9e4d54cea606.
Verify the scanner.
gvm@kali$ gvmd --verify-scanner=05994048-f7f5–4469-a8f1–9e4d54cea606
Scanner version: OpenVAS 7.0.1.
Create OpenVAS (GVM 11) Admin User
Create OpenVAS administrative user by running the command below.
gvm@kali$ gvmd --create-user admin
User created with password '57476315-881b-4634-afd8-4b9d46b3be68'.
This command generates a random password for the user.
If you want to create a user and at the same time create your own password.
gvm@kali$ gvmd --create-user admin --password=AVeryStronGP@SSw0rdOtherwise, you can reset the password of an already existing user.
gvm@kali$ gvmd --user=<USERNAME> --new-password=<PASSWORD>Accessing GVM 11 (OpenVAS)
Greenbone Security Assistant (GSA) WebUI daemon opens port 443 and listens on all interfaces. If firewall is running, open this port to allow external access.
ufw allow 443/tcpYou can now access GSA via the url https:<serverIP-OR-hostname>. Accept the self-signed SSL warning and proceed.
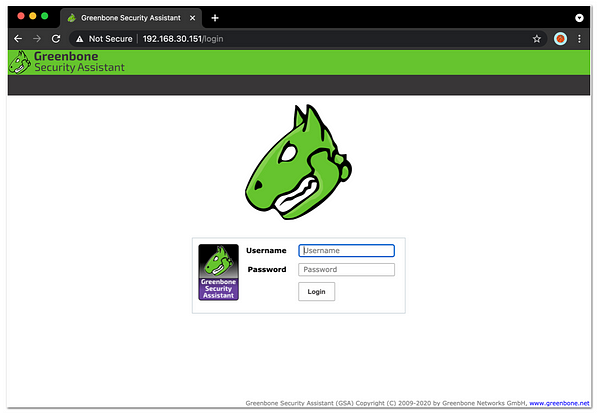
Greenbone Security Assistant / OpenVAS GUI
That’s all folks.
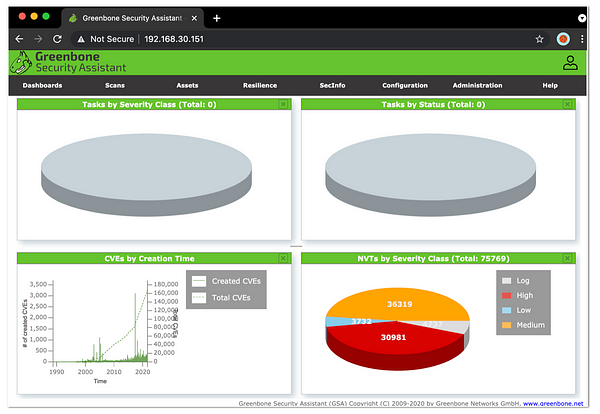
As of now, you should’ve been able to access Greenbone Security Assistant, or known as OpenVAS GUI.
OpenVAS also provide features for M2M interaction, through its features you can integrate other tools to OpenVAS.
Let’s save them for next article, shall we? ;)