

Introduction
One of the objectives of ITSEC’s R&D is to provide a hacking environment to support our colleague's research activities. This article will provide a basic architecture and strategy to set up a corporate lab. The wider community can then use this setup for their own internal lab.
Hacking lab infrastructure can be built in several ways. This is only one of several strategies. This is a basic infrastructure that has at least two considerations:
- Flexible: Since most team members are working in hybrid environments, lab access should be flexible to accommodate those who bring their own devices. This will allow the organization to maintain the necessary security controls.
- Setup shouldn't take long. IT Security is dynamic and focused-specific. While it's good to have some experience, such as setting Linux components up from scratch, IT Security professionals should use their time to research security-related things such as finding vulnerabilities.
Scalability is another consideration (scaling up horizontally) but this would come after the basic infrastructure has been built.
Architecture
Here is the basic infrastructure of a lab:
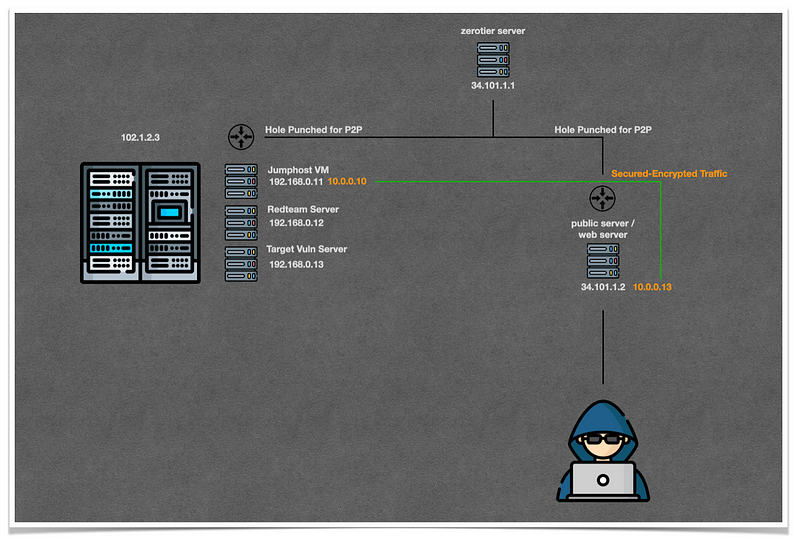
Zerotier is preferred here to meet the two considerations. Using Zerotier in conjunction with other secure access, such as identity management, will result in a zerotrust-like architecture with fully encrypted traffic between two end points.
The public webserver can be built based on the proximity of the user. For example, if the team is located in Indonesia, then the public server will be built on a Jakarta public cloud datacenter.
The architecture hides our virtual machines' datacenter. Users will interact with a public server which forwards traffic to Jumphost VM via secured-encrypted P2P hole punched. The architecture would be similar to VPN infrastructure if there was only one public data center and one access point for virtual machines. This architecture is at its best when it can be scaled horizontally to multiple data centers, using several stacks like OpenStack and Kubernetes. The advanced setup can be used as a platform for a cyber-range system too.
Application
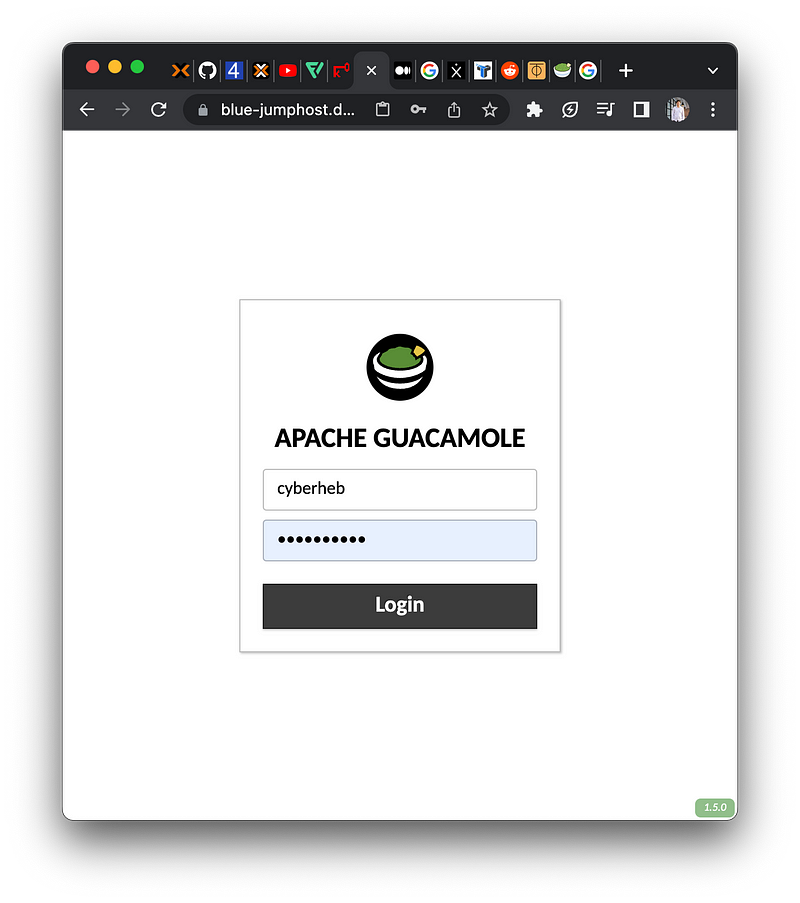
Apache Guacamole and Apache Reverse Proxy Server is used as the two most important components in this setup.
Apache Guacamole allows access to the VM from any web browser. IT Security personnel don't need to worry about connectivity or basic setup. They can focus on solving Cybersecurity issues. IT Security personnel would be more productive if they had easy access to the environment via Apache Guacamole, which provides both terminal connectivity and GUI.
Apache Guacamole
Here’s the step-by-step setup of Apache Guacamole, adapted from this article. At the time of this writing, the latest version of Apache Guacamole is version 1.5.0.
### install package depedencies
$ sudo apt install build-essential libcairo2-dev libjpeg-turbo8-dev libpng-dev libtool-bin uuid-dev libossp-uuid-dev libavcodec-dev libavformat-dev libavutil-dev libswscale-dev freerdp2-dev libpango1.0-dev libssh2-1-dev libtelnet-dev libvncserver-dev libwebsockets-dev libpulse-dev libssl-dev libvorbis-dev libwebp-dev mariadb-server -y
### install apache tomcat 9 package
$ sudo apt install tomcat9 -y
# start and enable tomcat9
$ systemctl enable --now tomcat9
$ systemctl status tomcat9
### compile and install guacamole server (version 1.5.0)
$ wget https://dlcdn.apache.org/guacamole/1.5.0/source/guacamole-server-1.5.0.tar.gz
$ tar -xzvf guacamole-server-1.5.0.tar.gz
$ cd guacamole-server-1.5.0
# configure Guacamole server installation and verify system requirements
$ ./configure --with-systemd-dir=/etc/systemd/system/ --disable-dependency-tracking
# Compiling the source code
$ make
# Installing Guacamole server
$ sudoa make install
# Update symbolic links of the system libraries
$ sudo ldconfig
# Reload the systemd manager, and apply the new systemd service (guacd)
$ sudo systemctl daemon-reload
# Start and enable guacd
$ sudo systemctl enable --now guacd
# Verify guacd
$ sudo systemctl status guacd
### prepare guacamole configuration and directory
# This command ensures the tomcat9 service loads the Guacamole configuration directory (/etc/guacamole)
$ sudo echo GUACAMOLE_HOME=/etc/guacamole >> /etc/default/tomcat9
$ sudo mkdir -p /etc/guacamole/{extensions,lib}
# Lastly, run the below command to create Apache Guacamole configuration files (guacamole.properties and guacd.conf) below:
# The guacamole.properties file is the main configuration for Apache Guacamole.
# The guacd.conf file is the configuration for the Guacamole server.
$ sudo touch /etc/guacamole/{guacamole.properties,guacd.conf}
### Setting Up MariaDB Database
$ sudo systemctl enable mariadb.service && systemctl start mariadb.service
$ mysql -u root -p
Enter password: <empty>
MariaDB [(none)]> CREATE DATABASE guacamole_db;
exit
# Run the wget command below to download the Guacamole database authentication extension.
$ cd ~; wget https://dlcdn.apache.org/guacamole/1.5.0/binary/guacamole-auth-jdbc-1.5.0.tar.gz
# Extract guacamole-auth-jdbc-1.5.0.tar.gz
$ tar -xf guacamole-auth-jdbc-1.5.0.tar.gz
# Change the working directory
$ cd guacamole-auth-jdbc-1.5.0/mysql/
# Run the cat command below to import the Apache Guacamole MariaDB database schema (schema/*.sql) to the guacamole_db database.
# Check if the Apache Guacamole MariaDB database schema exists
# Import the database schema (schema/*.sql) to the guacamole_db database
cat schema/*.sql | mysql -u root -p guacamole_db
# Now, rerun the mysql command below to log in to the MariaDB shell. You’ll set up a new MariaDB user for the Apache Guacamole.
$ mysql -u root -p
Enter password: <empty>
# run the MariaDB queries below to create a database user for the guacamole_db database
# Create a new user called guacamole_user.
# Make sure to change the password with a strong password.
CREATE USER 'guacamole_user'@'localhost' IDENTIFIED BY 'guacamole_password';
# Allow the user guacamole_user to access the guacamole_db database.
GRANT SELECT,INSERT,UPDATE,DELETE ON guacamole_db.* TO 'guacamole_user'@'localhost';
# Reload privileges from the privilege tables
FLUSH PRIVILEGES;
# Exit from MariaDB shell.
exit
### Installing Database Authentication Extension and MySQL/J Library
# change working directory
cd ~/guacamole-auth-jdbc-1.5.0/mysql/
# check list files
ls -latr
# run the cp command below to install the Guacamole database authentication extension (guacamole-auth-jdbc-mysql-1.4.0.jar) to the /etc/guacamole/extensions/ directory
$ sudo cp guacamole-auth-jdbc-mysql-1.5.0.jar /etc/guacamole/extensions/guacamole-auth-jdbc-mysql.jar
# Run the wget command below to download the MySQL/J connector (library) for Java (mysql-connector-java_8.0.28-1ubuntu20.04_all.deb)
$ cd ~
$ wget https://cdn.mysql.com//Downloads/Connector-J/mysql-connector-j_8.0.32-1ubuntu20.04_all.deb
# run the dpkg command below to manually install the MySQL/J connector (mysql-connector-java_8.0.28-1ubuntu20.04_all.deb) to your Ubuntu system
$ dpkg -i mysql-connector-j_8.0.32-1ubuntu20.04_all.deb
# run the below command to copy the MySQL/J connector library to the /etc/guacamole/lib/ directory. This command allows the Apache Guacamole to use the MySQL/J library to connect to the MariaDB database
# copy the MySQL/J connector
$ sudo cp /usr/share/java/mysql-connector-j-8.0.32.jar /etc/guacamole/lib/mysql-connector.jar
### Configuring Apache Guacamole with MariaDB Database
# Edit the /etc/guacamole/guacamole.properties file using your preferred editor and populate the configuration below:
$ cat <<EOF | sudo tee /etc/guacamole/guacamole.properties
mysql-hostname: localhost
mysql-port: 3306
mysql-database: guacamole_db
mysql-username: guacamole_user
mysql-password: guacamole_password
EOF
# Edit the /etc/guacamole/guacd.conf file and populate the following configuration
$ cat <<EOF | sudo tee /etc/guacamole/guacd.conf
[server]
bind_host = 0.0.0.0
bind_port = 4822
EOF
# restart guacd
$ sudo systemctl restart guacd
# restart tomcat9
$ sudo systemctl restart tomcat9
# Installing the Guacamole Client Web Application
$ wget https://dlcdn.apache.org/guacamole/1.5.0/binary/guacamole-1.5.0.war
# Rename guacamole-1.4.0.war to guacamole.war
$ mv guacamole-1.5.0.war guacamole.war
# Copy guacamole.war
$ sudo cp guacamole.war /var/lib/tomcat9/webapps
# Verify guacamole.war
$ ls /var/lib/tomcat9/webapps
# install zerotier so the server can connect through zerotier network
$ curl -s https://install.zerotier.com | sudo bash
# integrate the server into ZT network, for example:
root:~# zerotier-cli join d35b1e391ecxxxxx
# make sure /etc/hosts contain following ip-to-hostname:
127.0.0.1 localhost localhost.localdomain # localhost ip address
192.168.0.11 annie-jumphost # vm ip address
10.0.0.10 annie-jumphost-zt # zerotier ip address
# edit the Tomcat configuration (/etc/tomcat9/server.xml) and populate the following configuration inside the <Host> section
# This configuration allows an application within Tomcat to see the real IP address of the client. You’ll need this configuration because the main application Guacamole client is behind the Apache reverse proxy (IP 10.110.5.41 is public apache server ZT IP address):
...
<Engine name="Catalina" defaultHost="annie-jumphost-zt">
...
<Host name="annie-jumphost-zt" appBase="webapps"
unpackWARs="true" autoDeploy="true">
...
<Valve className="org.apache.catalina.valves.AccessLogValve" directory="logs"
prefix="localhost_access_log" suffix=".txt"
pattern="%h %l %u %t "%r" %s %b" />
<Valve className="org.apache.catalina.valves.RemoteIpValve"
internalProxies="10.110.5.41"
remoteIpHeader="x-forwarded-for"
remoteIpProxiesHeader="x-forwarded-by"
protocolHeader="x-forwarded-proto" />
...
...
# Restart apache2
$ sudo systemctl restart apache2
# Restart tomcat9
$ sudo systemctl restart tomcat9Setup Apache Guacamole
Apache Web Server (Reverse Proxy)
Since we provide access to internet-facing users, we need to add Reverse Proxy to forward the traffic to the Apache Guacamole through an encrypted channel (P2P). The Reverse Proxy Server also provides a valid SSL certificate through Lets Encrypt.
Here is the configuration for Apache Reverse Proxy Server:
### Setting Up Apache as a Reverse Proxy for Guacamole Client; install in publicly reachable server i.e GCP, connect to cloud.google.com
$ sudo apt install apache2 -y
$ sudo a2enmod proxy proxy_wstunnel proxy_http ssl rewrite

# install certbot for letsencrypt SSL
$ sudo apt install certbot python3-certbot-apache

# install zerotier so the server can connect through zerotier network
$ curl -s https://install.zerotier.com | sudo bash

# integrate the server into same ZT network of guacamole server, for example:
root@webserver:~# zerotier-cli join d35b1e391ecxxxxx

# create a new virtual host configuration file (/etc/apache2/sites-available/guacamole.conf) and populate the below configuration
$ sudo vi /etc/apache2/sites-available/jumphost-server01.conf

<VirtualHost *:80>
    ServerName jumphost
    ServerAlias jumphost.example.localdomain.io

    Redirect permanent / https://jumphost.example.localdomain.io/
</VirtualHost>

<VirtualHost *:443>
    ServerName jumphost.example.localdomain.io
    ServerAlias jumphost.example.localdomain.io

    <If "%{HTTP_HOST} == 'jumphost.example.localdomain.io'">
    Redirect permanent / https://jumphost.example.localdomain.io/
    </If>

    ErrorLog /var/log/apache2/jumphost.example.localdomain.io-error.log
    CustomLog /var/log/apache2/jumphost.example.localdomain.io-access.log combined

    SSLEngine On
    SSLCertificateFile /etc/letsencrypt/live/jumphost.example.localdomain.io/fullchain.pem
    SSLCertificateKeyFile /etc/letsencrypt/live/jumphost.example.localdomain.io/privkey.pem

    <Location /guacamole/>
        Order allow,deny
        Allow from all
        ProxyPass http://10.0.0.10:8080/guacamole/ flushpackets=on
        ProxyPassReverse http://10.0.0.10:8080/guacamole/
    </Location>

    <Location /guacamole/websocket-tunnel>
        Order allow,deny
        Allow from all
        ProxyPass ws://10.0.0.10:8080/guacamole/websocket-tunnel
        ProxyPassReverse ws://10.0.0.10:8080/guacamole/websocket-tunnel
    </Location>

</VirtualHost>

# check if apache configuration is OK
$ sudo apache2ctl configtest

# add jumphost.server01.lab to A configuration of example.localdomain.io domain i.e godaddy
# create letsencrypt configuration, make sure the domain name has been configured otherwise the letsencrypt http-01 challenge would be failing
$ sudo certbot --apache

# here is the sample of above command output:
root@jumphost:~# sudo certbot --apache
Saving debug log to /var/log/letsencrypt/letsencrypt.log
Plugins selected: Authenticator apache, Installer apache
Enter email address (used for urgent renewal and security notices)
 (Enter 'c' to cancel): rnd.lab@itsecasia.com

- - - - - - - - - - - - - - - - - - - - - - - - - - - - - - - - - - - - - - - -
Please read the Terms of Service at
https://letsencrypt.org/documents/LE-SA-v1.3-September-21-2022.pdf. You must
agree in order to register with the ACME server. Do you agree?
- - - - - - - - - - - - - - - - - - - - - - - - - - - - - - - - - - - - - - - -
(Y)es/(N)o: Y

- - - - - - - - - - - - - - - - - - - - - - - - - - - - - - - - - - - - - - - -
Would you be willing, once your first certificate is successfully issued, to
share your email address with the Electronic Frontier Foundation, a founding
partner of the Let's Encrypt project and the non-profit organization that
develops Certbot? We'd like to send you email about our work encrypting the web,
EFF news, campaigns, and ways to support digital freedom.
- - - - - - - - - - - - - - - - - - - - - - - - - - - - - - - - - - - - - - - -
(Y)es/(N)o: N
Account registered.
No names were found in your configuration files. Please enter in your domain
name(s) (comma and/or space separated)  (Enter 'c' to cancel): jumphost.example.localdomain.io
Requesting a certificate for jumphost.example.localdomain.io
Performing the following challenges:
http-01 challenge for jumphost.example.localdomain.io
Waiting for verification...
Cleaning up challenges
Created an SSL vhost at /etc/apache2/sites-available/000-default-le-ssl.conf
Deploying Certificate to VirtualHost /etc/apache2/sites-available/000-default-le-ssl.conf
Enabling available site: /etc/apache2/sites-available/000-default-le-ssl.conf
Redirecting vhost in /etc/apache2/sites-enabled/000-default.conf to ssl vhost in /etc/apache2/sites-available/000-default-le-ssl.conf

- - - - - - - - - - - - - - - - - - - - - - - - - - - - - - - - - - - - - - - -
Congratulations! You have successfully enabled
https://jumphost.example.localdomain.io
- - - - - - - - - - - - - - - - - - - - - - - - - - - - - - - - - - - - - - - -

IMPORTANT NOTES:
 - Congratulations! Your certificate and chain have been saved at:
   /etc/letsencrypt/live/jumphost.example.localdomain.io/fullchain.pem
   Your key file has been saved at:
   /etc/letsencrypt/live/jumphost.example.localdomain.io/privkey.pem
   Your certificate will expire on 2023-06-15. To obtain a new or
   tweaked version of this certificate in the future, simply run
   certbot again with the "certonly" option. To non-interactively
   renew *all* of your certificates, run "certbot renew"
 - If you like Certbot, please consider supporting our work by:

   Donating to ISRG / Let's Encrypt:   https://letsencrypt.org/donate
   Donating to EFF:                    https://eff.org/donate-le

# disable default apache
$ sudo a2dissite 000-default.conf
$ a2dissite 000-default-le-ssl

# activate jumphost-server01.conf
$ sudo a2ensite jumphost-server01.conf

# verify apache2 configuration
$ sudo apachectl configtest

# if result is OK, then reload apache2
$ sudo systemctl reload apache2
Setup Apache Reverse Proxy
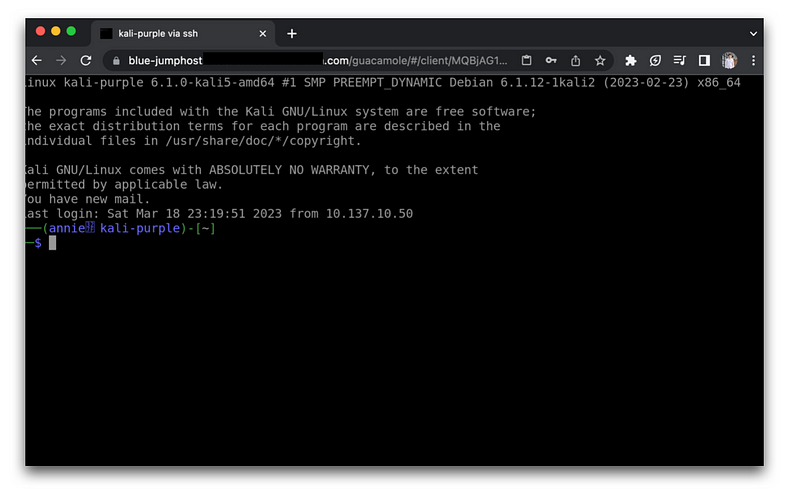
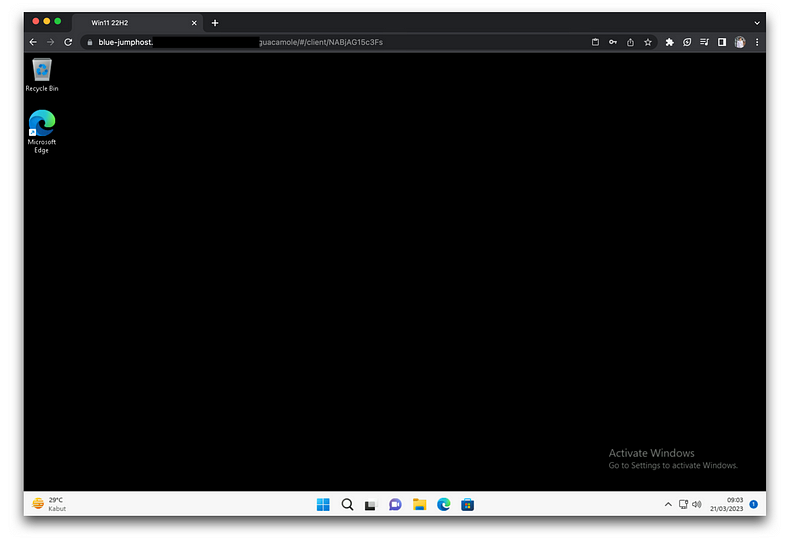
Access The Lab
Now, with Apache Guacamole and Reverse Proxy configured, we can simply use the internet browser to access the lab.
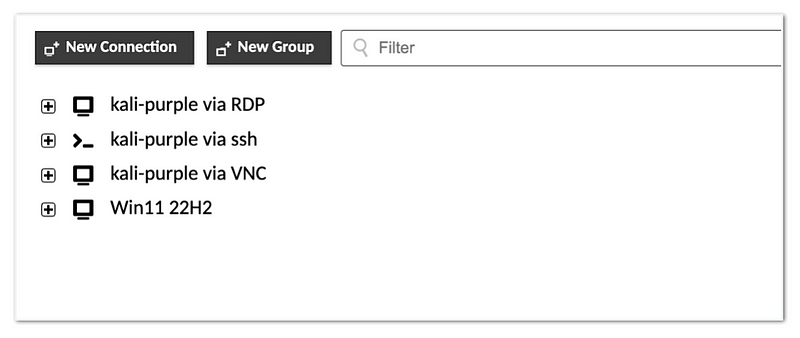
Our IT Security team can start performing various research activities, such as offensive, defensive, malware analyses, incident response, devsecops and many more.
The more interesting thing would be to automate and scale up all of these labs so that any newcomer to ITSEC Asia could start learning on their own and conduct a lot of Cybersecurity research to prepare for the customer's environment.